A small cold front came through Florida Saturday night and Sunday. When I say cold I mean a teeth chattering 50-ish degrees. 😉 Yes I know, I can hear all my north and midwestern friends and readers collectively tell me to get F’ed.
Anyway when its cold, there is nothing better then a nice warm bowl of chili. I am not talking that canned shit, or some ground meat with taco seasoning. I am also not talking about anything with beans. I am talking about authentic Texas chili from scratch. Its easier then you think to make and I promise you that once you make it like this you wont want it any other way. Well you might but in your mind you’ll be all like, what the hell is wrong with me, I just should have made it like Brock did.
Some Texans and in fact some sanctioned Chili cooking competitions allow for ground meat. If you like ground meat in your chili go for it. However to me and I am betting you will agree when you try, chili with small chunks of meat his much better. When I make chili I just buy a two to two and a half pound chuck roast and cut the meat up into small cubes.
Authentic Texas style chili is easy to make and really only requires a handful of ingredients. If you want to add beans to your chili, you can, if you feel you must. Authentic Texas style chili however rarely has any beans. Onion, meat, tomatoes is really all you need in as far as the ingredients to make good chili. Of course there is the spices but I am going to show you have to handle that since its easy enough.
Now lets talk spices. Its easy enough to buy Chili powder in the store and if you want to, go for it. Its not a problem. However, I make my own and if you have a blender, food processor, a spice grinder or even and old school mortar and pestle then I would try to make your own chili powder. Its easy to do and tastes 100X’s better then store bought.
Here’s how:
In your supermarket on the ethnic food isle or section look for the dried whole chili peppers. Down here its by the Goya Spanish/Latin canned stuff. Usually there are plastic bags of dried Chipotle, Serrano or Banana Peppers. Grab one of each. Heat your oven to 300 degrees and spread all the peppers out on a baking sheet and toast the peppers in the oven for 15-25 minutes. They will toast up and get a little smokey. Check often, you’ll smell them get toasty. Take them out then let cool to room temp. They will be really dry and brittle.
When they are room temp, grind them all up into a powder. You can use a blender, spice grinder, food processor or a mortar and pestle. In the end you wind up with about a half a cup of homemade chili powder. Put in an air tight container and it will last in fridge forever. Make chili, BBQ sauce, BBQ rub whatever. Try it though. Its easy and beats the tits off regular old store bought chili powder.
The chili and spices are added to the chili in two separate times or as the chili competition people refer to as “Dumps”. You “dump” in half the spices in the beginning of the cook and then “dump” in the other half of the spices at the end of the cook.
This chili is rather thin while cooking. Its almost more soup life then chili like. Don’t be alarmed. The last half hour the chili is cooked with the lid off the pot and the chili will thicken. If its still too loose, you can thicken it up with a tablespoon of cornstarch and cup of water mixed and and added into the chili. But you probably wont need to thicken it when its done cooking.
You can top the chili with damn near anything you like when you are ready to eat. These days instead of making corn bread, I just buy a bag of plain old Frito Corn chips and throw a handful on top with some grated Cheddar Cheese.
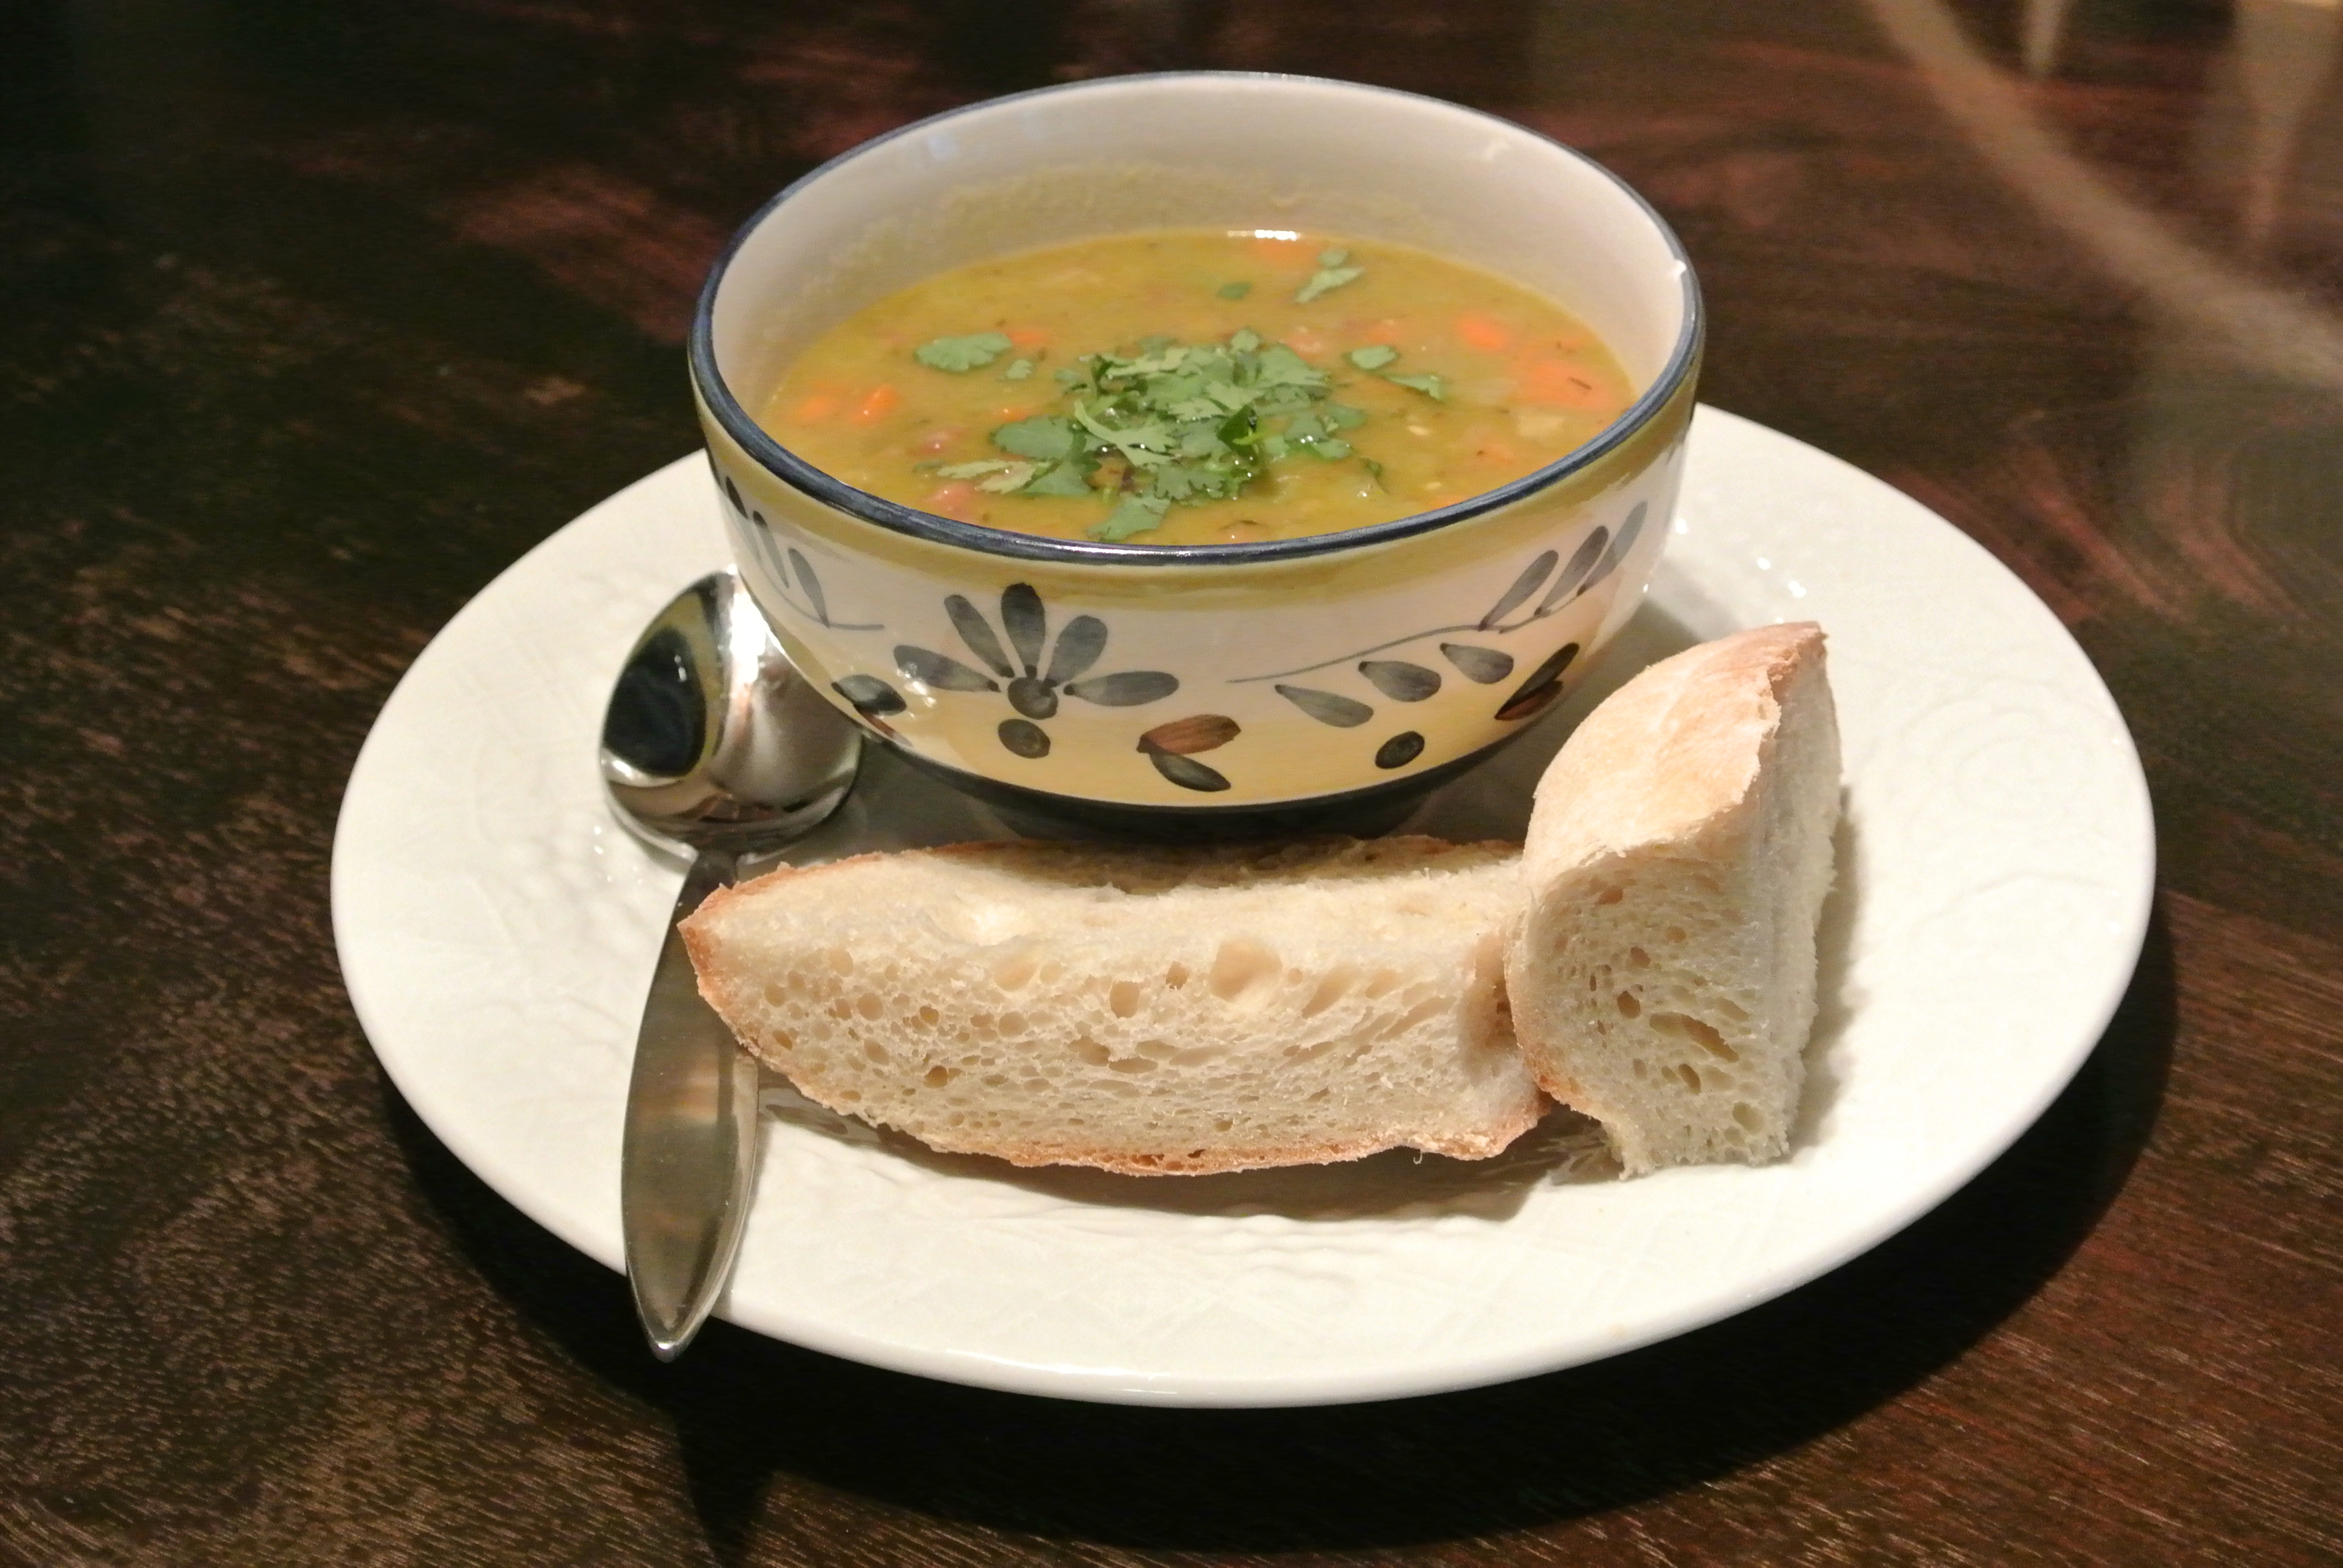
Its after Christmas, you’re looking in the refrigerator wondering what you are going to do with all the holiday leftovers. There’s a ham, carrots, celery, some onions and you have no idea what to do? Make soup. Its easy, its good for you and it cleans out some of the fridge. Win! Bonus if its cold outside and you’re freezing too.
French Macaroons seem to be all the baking rage lately. Some will also have you believe that you need to be a French pastry chef in order to make them. WRONG. Its easy. Easy if your not like handicapped in a way that you may run out in busy traffic or play golf in a raging lightning storm.
The French Macaroons are a cookie made with ground almonds, sugar and beaten egg whites. If you have a nut or egg allergy beware. I don’t want any news that one of you allergic types tried these then you seized up and had to take fifteen Epi-Shots in your butt to keep you from heading into the bright lights.
Generally speaking the cookies have either buttercream or jelly/jam spread in between the cookies. I went the butter cream route today. The cookies have a semi hard plastic shell type exterior and soft chewy interior. You can dye them any color you like.
Here are a few pictures of my examples I busted out this afternoon.
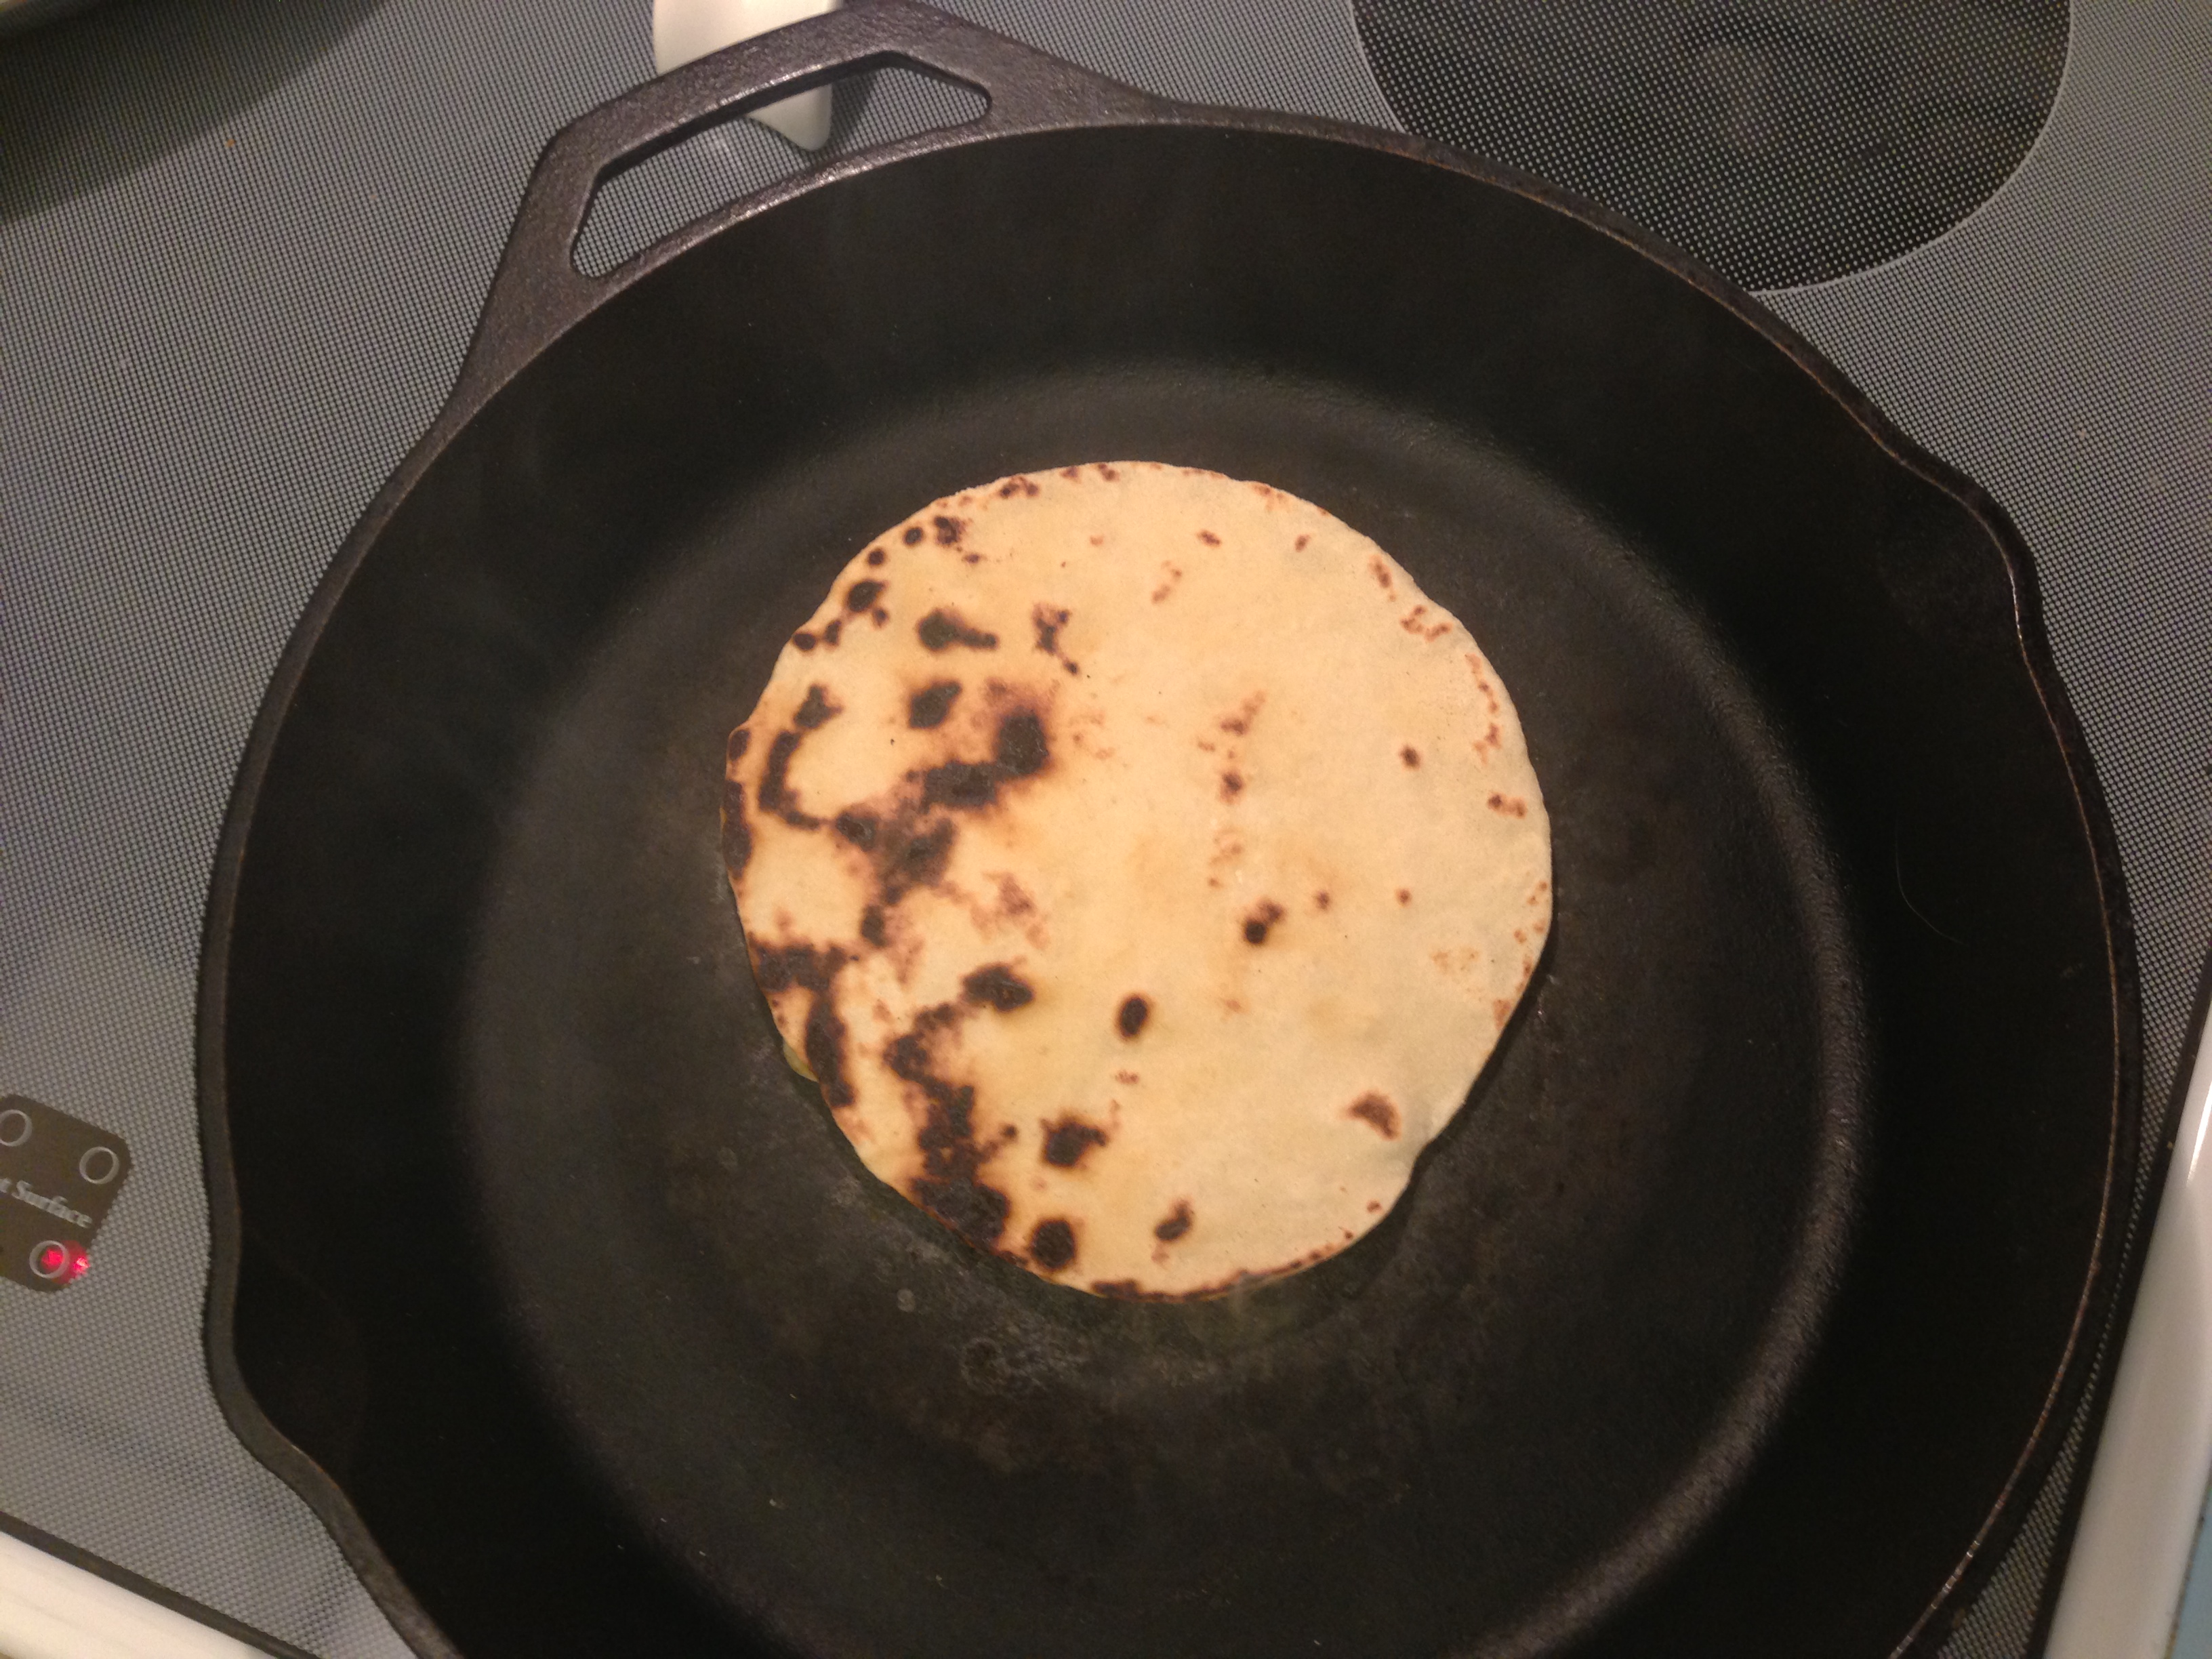
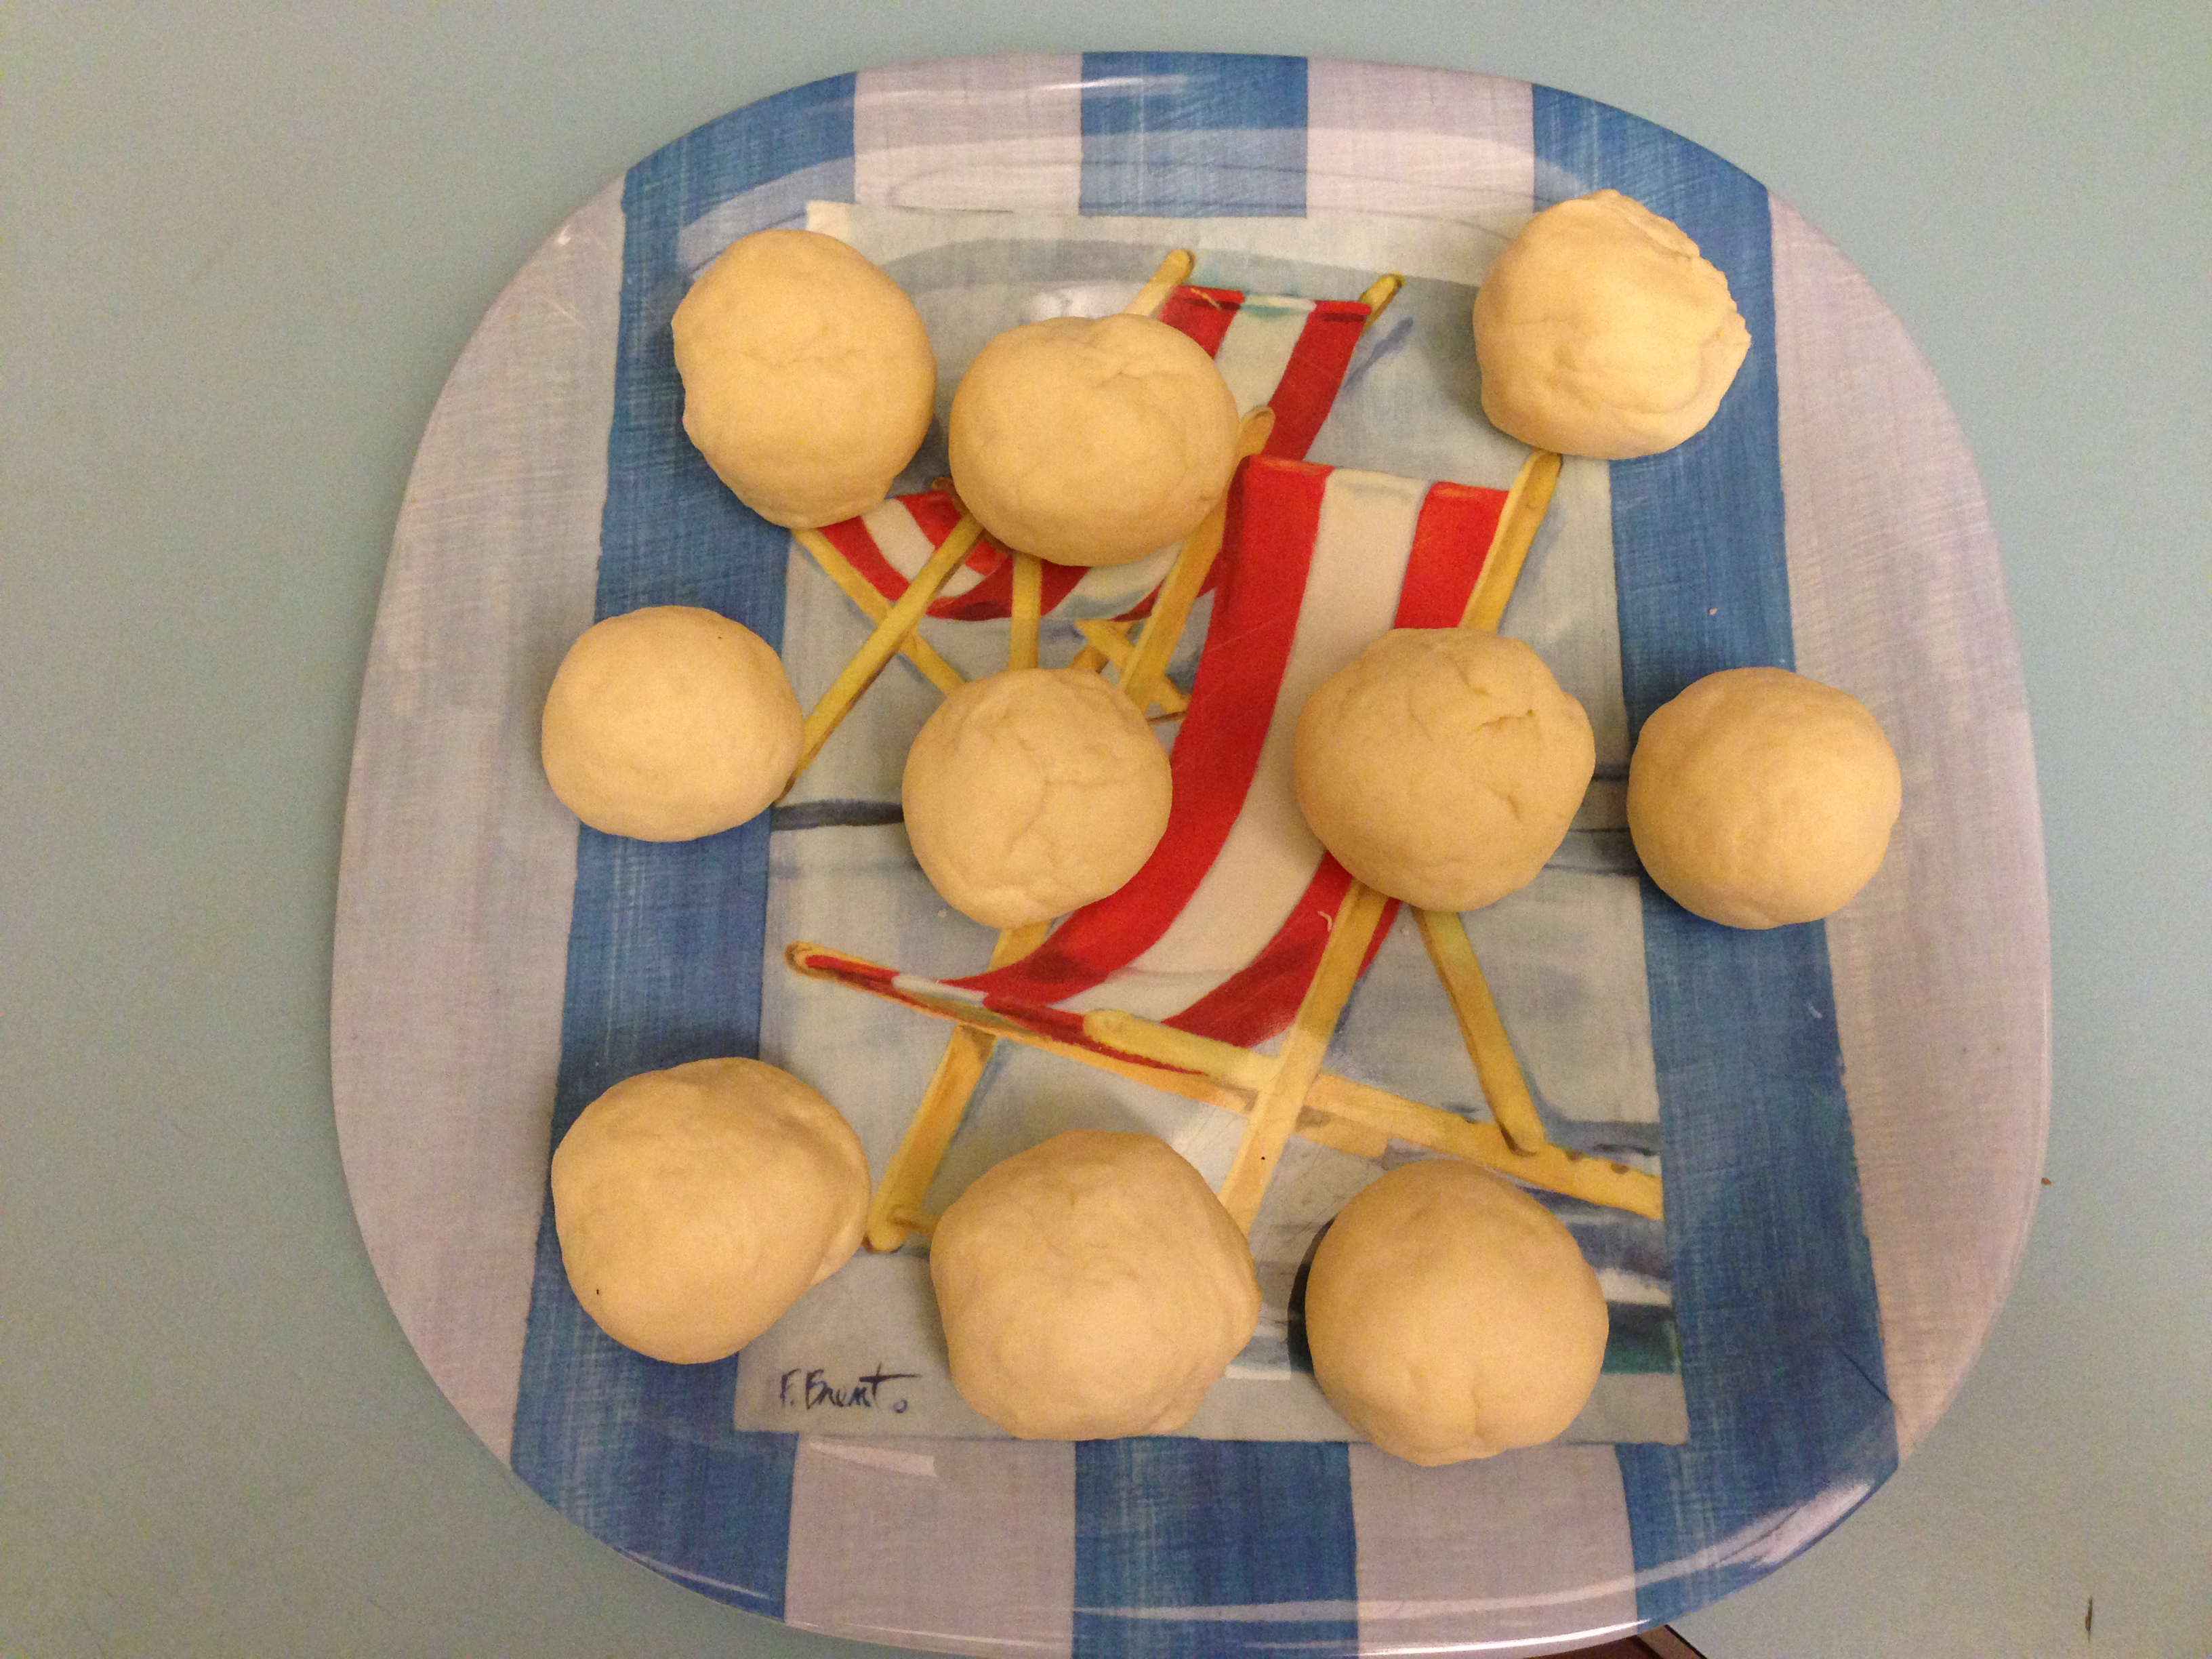
After Italian food, TeX-Mex is probably my next favorite and in particular Tacos. Not that fast food shit either. The real deal. Flour tortillas, some kind of meat product, a little red onion, tomato, cilantro, lime. There is nothing better. Flour tortillas are easy to make at home and take no time at all.
You can pretty much put anything protein wise in a taco. Beef, chicken, pork, so I am not going to discuss the protein much here. However I will give you the recipe on how to make homemade flour tortillas. Once you make your own flour tortillas you’ll never buy the pre made tortillas from the store again.
The only special equipment you need to make your own flour tortillas is a cast iron pan. If your a true southerner then you have a cast iron skillet, or you were placed on this earth by aliens. In reality everyone should own one cast iron pan so the special equipment disclaimer for this recipe is more or less negligible. Just be advised.
Panini is the plural form of the Italian world panino meaning small bread roll. In America we have adopted Panini to symbolize toasted and pressed warm sandwiches.
Well I made one tonight and it was fantabulous which is Brock speak for “goddamn thats a good sandwich.
Fist I made a loaf of bread. You don’t have to make your own bread, but I did. Its too damn easy if you have a bread machine. Fresh homemade bread makes the house smell nice, and I was a little gassy today.
Then I made some tomato sauce. You don’t have to make your own tomato sauce, but I did. Its super easy. Just sauté an onion some bell pepper a little garlic. Then add a few good tablespoons of tomato paste, some chicken stock and simmer. Salt and pepper to taste, and boom you have a basic tomato sauce.
I brined and roasted a chicken the other night and had some leftover breast meat. You don’t have to brine and roast your own chicken but I did.
I also grew some fresh basil. You don’t have to grown your very own basil but I did. Herbs are easy to grow.
I did not make my own mozzarella cheese because I have not ordered any rennet tablets yet, but soon I’ll make my own cheese too. So do Like I did and go to the store and buy some mozzarella cheese. I pretty much have some on hand at all times. If cheese was like a person, I’d think of mozzarella as fresh little brand new babies or brand new puppies. Clean, mild, and milky.
If you have a panini maker you’re pretty much all set. Just assemble the sandwich with the listed ingredients and place in a heated panini maker. A few minutes later you’re all done. Slice and eat.
Roasted Chicken Tomato Basil and Mozzarella Panini
I can still remember how that music use to make me smile.
And I knew if I had my chance I could make those people dance.
And maybe they’d be happy for a while.
Is today black Friday? You’re freakin’-A right it is! Hostess Brands the iconic maker of such things as Twinkies, Zingers, Devil Dogs, and Wonder Bread is shutting down and gone.
The company has been in trouble for a couple of years now. When you really look at the numbers from an objective eye to business, this one is a shame. There was obvious management and leadership problems here. It wasn’t too late to fix those issues and the company and board of directors were trying. Want to know what killed this company? The damn unions! 18,000 plus workers get to go home without a job this holiday season and for the first time since 1930 we get to walk through a grocery store and not see a box of Twinkies or a loaf of Wonder Bread for sale.
Being a child of the seventies and eighties, I can tell you these foods were a normal part of life. I didn’t know there was anything other then white sandwich Wonder bread until I was probably twelve years old. In fact there was a loaf of it in my parents house last week. My father still eats it.
Twinkies and Devil Dog snack cakes have an indelible mark on my childhood. My grandmother used to have a dedicated drawer in her kitchen where at any time in history there was a box of Twinkies and or other snacks. Guaranteed! Not just when grandchildren were visiting either. My grandmother as sure as rain had on hand at ALL times Twinkies, Devil Dogs, and out in the refrigerator in the laundry room at least a case of Yoo-Hoo. In fact, I would bet my last dollar right this second that somewhere in Virginia in my grandmother’s kitchen at this very moment is a Twinkie, Ding Dong, Devil Dog, or other reasonable facsimile of a snack cake, junk food, or candy treat with roots to this iconic company. She may not remember it and it could very well be past its published shelf life (which is in and of itself not possible), but I’d bet I am right. If I was there right now, I’d eat that damn thing and sit and cherish fond memories of my grandparents and being a small boy without a care or problem in the world one last time.
It’s a cruel world out there today.
This week I re-visited my homemade pizza recipe and finally published it in the Recipe section of this blog. I have pontificated on New York style pizza and especially making it at home here on this blog in the past. I have come to the conclusion that pizza is pretty much the best food in the world. Getting the basics down and being able pull off a good pie at home is easier then one would think. I tested and retested the basic dough recipe, oven temperatures and cook times. Its a slam dunk. I am now going to move into making my own mozzarella and I have fresh basil growing. I will plant tomatoes this spring. By June of next year, with the exception of the yeast and flour, I fully intend to make a pizza from scratch with everything 100% home grown and or killed. Yes, I will kill a hog and make my own sausage.
Pizza made in the oven, pizza made on the grill, pizza made on the Big Green Egg, I am going to document it all right here. There is too much cheap shitty pizza out there, and I am going to prove we do not need to put up with that garbage.
It just occurred to me. How in the 7th level of hell can we as a country watch the maker of Twinkie and Wonder Bread cease to exist, yet that bullshit Domino’s, Papa Johns, and Pizza Hut can survive through a plague?
Well, not on my watch. YOU NEED ME ON THAT WALL! Can you handle the truth? They can have my pizza when they pry it from my cold dead hands. REMEMBER THE ALAMO and THE TWINKIE!
So that’s where we are on this Friday before Thanksgiving. I got a recipe for Turkey shepherds pie. Its a great way to get rid of leftovers. I’ll put it in the recipe section next week.
Be safe, have fun, love one another and enjoy the weekend.
Pizza is so easy to make at home and better then anything you can buy in a frozen food section at the grocery store. You can also make pizza for about 1/3 of the price then if you buy them from the store or even from your favorite take out pizza shop.
There is one caveat to all things making pizza at home. You need a pizza stone for the oven and you need a pizza peel. (wooden/or metal large spatula shaped thing) Everyone should have a pizza stone in the oven permanently anyway for even heat distribution. I leave mine on the lower rack all the time. It stays in there forever. You can make bread on it, cook other things on it doesn’t matter. I like the rectangular stones more then the circular ones, but by all means use what you want.
Before we get going too far along, I should probably clear something up right now. When I am talking about pizza, I am specifically talking about New York style pizza. Thin-ish crispy outside, lightly chewy and airy interior crust. That Chicago shit isn’t pizza. Yes I went there and said it! Its named the same thing and its usually round but thats where similarities end. Don’t get me wrong. Chicago style pizza has its place and I like some of it, but to me its not pizza. It’s like midwestern corn-fed healthy survive winter meat pie type food. Its not pizza. I have been all over Italy more then six times and nowhere in any part of that country is there a reasonable facsimile to “Chicago style” pizza. The Italians brought pizza over from Italy. When the GI’s returned from Italy in World War II they wanted the pizza they ate in Italy and pizza as we know it in this country took off based on pizza from Italy. What we call New York style pizza is the closest form of pizza from Italy today and its still not even the same.
There are two tricks you need to make a good New York style pizza at home. Dough and heat. Thats all you need and it doesn’t get much simpler.
Lets talk about the dough. Dough for pizza is easy to make and you need no special ingredients. A decent higher protein/gluten flour, salt, yeast, and water.
There are basically two kinds of flour available in the stores. All purpose and bread flour. Bread flours have a higher protein/gluten level up to 15 percent. All purpose flour is lower and usually only up to 11 percent protein/gluten. King Arthur All Purpose flour is almost 12% and thats what I use. No sense in buying all kinds of different flours. If you cant get King Arthur where you live then get the bread flour.
Dough
Ingredients:
2-1/4 teaspoon Active Dry Yeast
1 cup (8 oz) Warm Water
2-1/2 cups (11.5 oz) Flour
1 teaspoon of Salt
Pour the yeast into the warm water and let sit for 10 minutes until yeast starts to bloom.
Sift the flour and salt together in the bowl of a stand mixer or normal bowl.
When the yeast has bloomed pour the water/yeast into the flour and mix together until just combined. A minute or two in mixer or with a spoon just until a wet shaggy dough forms. This dough will seem wet, do not worry. When its just combined let it sit for fifteen (15) minutes. This is called Autolyse. You’re hydrating the dough, getting the yeast spread throughout the flour. Its ok, just walk away and take a break. Leave it right in the bowl.
Now mix or knead the dough. In a stand mixer with a dough hook let it run on low for ten (10) minutes. Or pour the dough out on a lightly floured surface and hand knead the dough for ten minutes. You may add small amounts of four to tighten the dough up but not too much. Just keep kneading and the dough will come together just fine. Don’t give up. After kneading the dough you have two options.
Option 1: place dough in a lightly oiled ziplock bag and store in refrigerator for up to three (3) days. The dough will ferment in the fridge and develop a stronger deeper flavor.
Option 2: Place the dough into a lightly oiled bowl and cover with plastic wrap. Allow the dough to rise on counter for an hour and half. (1-1/2 hr)
If you put the dough in fridge for a day or so, take out about an hour before you’re ready to use and allow to come to room temperature.
Heat
Pre-heat your oven and pizza baking stone an hour before making pizza. Set your oven as high as it will go. 450-500 degrees. Don’t be scared. Make that sucker like a blast furnace. Its winter time, who cares? Release hell in that oven. Heat the stone up for an hour.
Assembly
Take your dough and on a lightly floured surface punch down and knead for a minute or so. Cut dough in half. There will be enough for two (2) nine inch pies. Take first half on lightly floured surface and roll dough out. At first it will seem to spring back and not want to roll out. Keep going and be patient. It will stretch out. Roll it out to about the size of your pizza peel and or pizza stone. Once its rolled and stretched out, transfer the dough to a well floured peel. Don’t be scared to rub some serious flour on the peel but don’t get crazy. Just lay the dough on the floured peel. When you shake the peel back and forth the dough should gently slide back and forth with little resistance.
Now here is where you make the pizza your own:
Sauce the pizza. You can buy jars of pizza sauce or make your own. I have done both. Its up to you.
Cheese the pizza. Fresh slices of Mozzarella, shredded, whole milk, low fat milk, your choice. You want the whole milk cheese though. It melts better and doesn’t taste like rubber. How much cheese you put on the pie is up to you. I find less is more. Do what you like.
Toppings. Add the toppings you like. Again less is more. This time I had a green Bell pepper and some red onion to get rid of so guess what I used? Pepperoni, sausage, its up to you.
Cook
Now carefully take your assembled pizza and transfer the pie to the pre-heated pizza stone. Gently shake the peel back and forth and the pie will want to run off the end of the peel. Place it on the stone and close oven.
Now if you are running the oven at 450 or above, don’t go far. The pizza will be done in six (6) minutes or less. Start checking it about the four minute mark. You want the cheese to melt get a little brown but not burn. It will go fast so pay attention.
When done, carefully pick up the side of the crust and slide peel under the pizza and pull out of oven on pizza peel.
You just made your own pizza. If you followed this recipe and instructions it should look closely to these examples.
See? Its so easy to do and make. You will also be amazed at how good they taste. Oh yea, there is also about $2 worth of ingredients here.
Pour the yeast into the warm water and let sit for 10 minutes until yeast starts to bloom.
Sift the flour and salt together in the bowl of a stand mixer or normal bowl.
When the yeast has bloomed pour the water/yeast into the flour and mix together until just combined. A minute or two in mixer or with a spoon just until a wet shaggy dough forms. This dough will seem wet, do not worry. When its just combined let it sit for fifteen (15) minutes. This is called Autolyse. You’re hydrating the dough, getting the yeast spread throughout the flour. Its ok, just walk away and take a break. Leave it right in the bowl.
Now mix or knead the dough. In a stand mixer with a dough hook let it run on low for ten (10) minutes. Or pour the dough out on a lightly floured surface and hand knead the dough for ten minutes. You may add small amounts of four to tighten the dough up but not too much. Just keep kneading and the dough will come together just fine. Don’t give up. After kneading the dough you have two options.
Option 1: place dough in a lightly oiled ziplock bag and store in refrigerator for up to three (3) days. The dough will ferment in the fridge and develop a stronger deeper flavor.
Option 2: Place the dough into a lightly oiled bowl and cover with plastic wrap. Allow the dough to rise on counter for an hour and half. (1-1/2 hr)
If you put the dough in fridge for a day or so, take out about an hour before you’re ready to use and allow to come to room temperature.
Heat
Pre-heat your oven and pizza baking stone an hour before making pizza. Set your oven as high as it will go. 450-500 degrees. Don’t be scared. Make that sucker like a blast furnace. Its winter time, who cares? Release hell in that oven. Heat the stone up for an hour.
Assembly
Take your dough and on a lightly floured surface punch down and knead for a minute or so. Cut dough in half. There will be enough for two (2) nine inch pies. Take first half on lightly floured surface and roll dough out. At first it will seem to spring back and not want to roll out. Keep going and be patient. It will stretch out. Roll it out to about the size of your pizza peel and or pizza stone. Once its rolled and stretched out, transfer the dough to a well floured peel. Don’t be scared to rub some serious flour on the peel but don’t get crazy. Just lay the dough on the floured peel. When you shake the peel back and forth the dough should gently slide back and forth with little resistance.
Now here is where you make the pizza your own:
Sauce the pizza. You can buy jars of pizza sauce or make your own. I have done both. Its up to you.
Cheese the pizza. Fresh slices of Mozzarella, shredded, whole milk, low fat milk, your choice. You want the whole milk cheese though. It melts better and doesn’t taste like rubber. How much cheese you put on the pie is up to you. I find less is more. Do what you like.
Toppings. Add the toppings you like. Again less is more. This time I had a green Bell pepper and some red onion to get rid of so guess what I used? Pepperoni, sausage, its up to you.
Cook
Now carefully take your assembled pizza and transfer the pie to the pre-heated pizza stone. Gently shake the peel back and forth and the pie will want to run off the end of the peel. Place it on the stone and close oven.
Now if you are running the oven at 450 or above, don’t go far. The pizza will be done in six (6) minutes or less. Start checking it about the four minute mark. You want the cheese to melt get a little brown but not burn. It will go fast so pay attention.
When done, carefully pick up the side of the crust and slide peel under the pizza and pull out of oven on pizza peel.

 A small cold front came through Florida Saturday night and Sunday. When I say cold I mean a teeth chattering 50-ish degrees. 😉 Yes I know, I can hear all my north and midwestern friends and readers collectively tell me to get F’ed.
 Some Texans and in fact some sanctioned Chili cooking competitions allow for ground meat. If you like ground meat in your chili go for it. However to me and I am betting you will agree when you try, chili with small chunks of meat his much better. When I make chili I just buy a two to two and a half pound chuck roast and cut the meat up into small cubes.


 I can still remember how that music use to make me smile.
 The company has been in trouble for a couple of years now. When you really look at the numbers from an objective eye to business, this one is a shame. There was obvious management and leadership problems here. It wasn’t too late to fix those issues and the company and board of directors were trying. Want to know what killed this company? The damn unions! 18,000 plus workers get to go home without a job this holiday season and for the first time since 1930 we get to walk through a grocery store and not see a box of Twinkies or a loaf of Wonder Bread for sale.
 Twinkies and Devil Dog snack cakes have an indelible mark on my childhood. My grandmother used to have a dedicated drawer in her kitchen where at any time in history there was a box of Twinkies and or other snacks. Guaranteed! Not just when grandchildren were visiting either. My grandmother as sure as rain had on hand at ALL times Twinkies, Devil Dogs, and out in the refrigerator in the laundry room at least a case of Yoo-Hoo. In fact, I would bet my last dollar right this second that somewhere in Virginia in my grandmother’s kitchen at this very moment is a Twinkie, Ding Dong, Devil Dog, or other reasonable facsimile of a snack cake, junk food, or candy treat with roots to this iconic company. She may not remember it and it could very well be past its published shelf life (which is in and of itself not possible), but I’d bet I am right. If I was there right now, I’d eat that damn thing and sit and cherish fond memories of my grandparents and being a small boy without a care or problem in the world one last time.
 So that’s where we are on this Friday before Thanksgiving. I got a recipe for Turkey shepherds pie. Its a great way to get rid of leftovers. I’ll put it in the recipe section next week.


